
Sheet Pan Chicken Thighs: 5 Easy Steps With Garlic Herbs
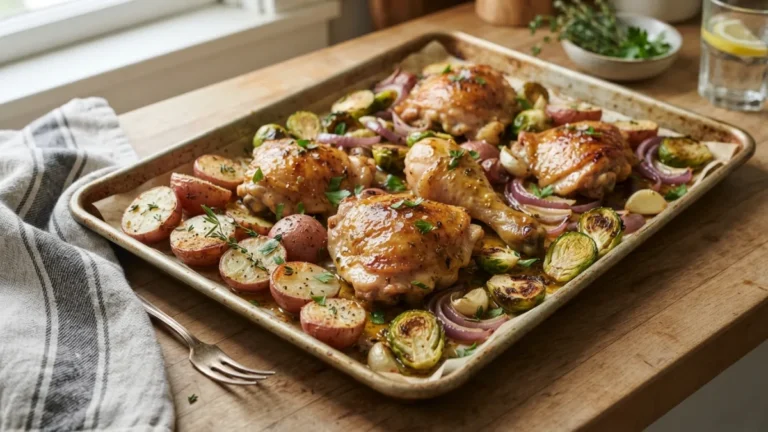
Some dinners ask for a stack of pots, three timers, and your full attention. This one asks for a single tray and a hot oven. Sheet pan chicken thighs with garlic, herbs, and a colorful mix of vegetables are the kind of meal that feels generous on the plate but takes very little effort to make. The chicken turns juicy and golden while the vegetables roast in the fat and juices below. The garlic softens and turns sweet. The herbs fill your kitchen with a smell that brings people to the table before you call them. If you’ve been looking for a dependable recipe to add to your regular rotation, you’ll want to keep this one close.
The appeal goes beyond flavor. Thighs are forgiving, affordable, and hard to overcook, which makes them ideal for home cooks who don’t want to hover over the stove. Roasting everything together also means fewer dishes, less cleanup, and a meal that adapts to whatever is in your fridge. Below, you’ll find a clear five-step method, advice on choosing your vegetables and cuts, tips for truly crispy skin, and guidance on keeping leftovers safe. Once you learn the basic pattern behind sheet pan chicken thighs, you can change the herbs, swap the vegetables, and build dozens of variations without ever opening a cookbook again. If you want to dig deeper, our guide on Chicken and Rice: 5 Easy One-Pot Recipes to Make Tonight covers this in more detail.
Why Thighs Work Better Than Breasts on a Sheet Pan
Chicken breasts are lean, and lean meat dries out fast in a hot oven. Thighs are different. They contain more fat and connective tissue, so they stay moist even if you leave them in a few minutes longer than planned. That extra richness also carries flavor well, especially garlic and herbs. Thighs have a deeper, more savory taste that stands up to strong seasoning and bold vegetables like onions, peppers, and Brussels sprouts. For a tray-based meal where timing is never perfectly exact, this margin for error matters a lot. It’s the main reason so many cooks treat sheet pan chicken thighs as their go-to weeknight protein.
Bone In Chicken Thighs or Boneless?
Both options work, but they behave differently. Skin-on, bone in chicken thighs take longer to cook, usually somewhere around 35 to 45 minutes at a high temperature, depending on their size and your oven. In return, you get crackly skin, extra juiciness, and a richer flavor, since the bone and skin protect the meat as it roasts. Boneless, skinless thighs cook faster, often in about 20 to 25 minutes, and they’re easier to eat and slice. The trade-off is that you lose the crispy skin. If you choose boneless, cut your vegetables smaller so they finish at the same time as the meat. For this recipe, skin-on thighs with the bone give the most satisfying result.
The Best Vegetables for Roasting Alongside Chicken
When you’re choosing the best vegetables for roasting with chicken, think about two things: how dense they are and how big you cut them. Hard vegetables need more time, while soft ones cook quickly and can turn mushy if they go in too early. The good news is that you can control this easily with your knife. Cut dense vegetables into smaller pieces and soft vegetables into larger chunks, and everything will finish together. Try to choose a mix of colors and textures, too. A tray with sweet potatoes, red onion, and green beans looks far more inviting than one filled with a single vegetable, and it offers more variety in every bite.
| Vegetable | Suggested Cut | When to Add | Why It Works |
|---|---|---|---|
| Potatoes (baby or Yukon Gold) | Halved or 1-inch cubes | At the start | Crisps up in chicken fat |
| Carrots | Thick coins or sticks | At the start | Turns sweet and tender |
| Red onion | Wedges | At the start | Caramelizes and softens |
| Brussels sprouts | Halved | At the start or midway | Edges get crispy and nutty |
| Bell peppers | Large strips | Midway | Adds color and sweetness |
| Zucchini or green beans | Large chunks or whole | Last 15 minutes | Stays bright without going soft |
How to Make Sheet Pan Chicken Thighs in 5 Easy Steps
The method below is simple, but each step has a purpose. Follow them in order the first time, and you’ll understand why the dish works. After that, feel free to experiment. This connects closely with another common issue — see 10 Sheet-Pan Dinners for Busy Weeknights for more on that.
Step 1: Mix the Garlic Herb Marinade
A good garlic herb marinade doesn’t need to be complicated. In a large bowl, combine about a third of a cup of olive oil, four to six minced garlic cloves, the juice and zest of one lemon, and a generous handful of chopped fresh herbs. Rosemary, thyme, parsley, and oregano all work well, alone or together. Add salt, black pepper, and a pinch of red pepper flakes if you like some heat. If you only have dried herbs, use about a third of the amount, since dried herbs are more concentrated. Whisk everything together, then taste it. It should be bright, salty, and strongly garlicky, because the flavor will mellow in the oven.
Step 2: Prep the Chicken and Vegetables
Pat the chicken dry with paper towels, then coat each thigh in about two-thirds of the herb mixture, rubbing some under the skin if you can. If time allows, let the chicken rest in the fridge for 30 minutes or up to several hours. Meanwhile, cut your vegetables using the sizes from the table above. Toss them with the remaining marinade so they’re lightly coated, not swimming in oil. Preheat your oven to 425°F (about 220°C) while you work. A fully heated oven matters here, because the chicken and vegetables need strong heat from the first minute to start browning instead of slowly steaming.
Step 3: Arrange the Pan Without Crowding
Spread the vegetables across a large rimmed baking sheet in a single layer. Then place the chicken on top or nestled between them, skin side up. This is the step where many home cooks go wrong. If the pan is packed too tightly, moisture gets trapped and the food steams, leaving you with pale chicken and soggy vegetables. Give everything some breathing room. If your tray looks crowded, use two pans instead of one. Lining the pan with parchment paper makes cleanup easier, though foil or a bare pan can give you slightly deeper browning on the vegetables underneath.
Step 4: Roast Hot and Check Halfway
Slide the pan onto the middle rack and roast. After about 20 minutes, open the oven and give the vegetables a quick stir so they brown evenly, but leave the chicken alone so the skin can keep crisping. This is also the moment to add quick-cooking vegetables like zucchini or green beans. Rotate the pan if your oven has hot spots. The browning you see, both on the skin and the vegetable edges, comes from the Maillard reaction, a chemical process that creates the rich, savory flavors people love in roasted food. High heat is what makes it happen. You might also find our article on Sheet-Pan Salmon and Vegetables in 25 Minutes helpful here.
Step 5: Confirm the Chicken Thigh Internal Temperature and Rest
Color alone can fool you, so the most reliable way to know your chicken is done is to check the chicken thigh internal temperature with an instant-read thermometer. Insert it into the thickest part of the thigh without touching the bone. The safe minimum internal temperatures chart from FoodSafety.gov lists 165°F (74°C) for all poultry. Many cooks prefer taking thighs a little higher, since the extra heat helps break down connective tissue and gives a more tender texture. Once done, let the tray rest for five to ten minutes. The juices settle back into the meat, and you get a moment to finish a quick salad or pour drinks.
Crispy Chicken Skin Tips That Actually Work
These crispy chicken skin tips can turn a good tray of chicken into a great one. Soft, rubbery skin is the most common complaint about oven-roasted thighs, and it’s almost always fixable.
- Dry the skin well. Moisture is the enemy of crispiness. Pat the thighs thoroughly before seasoning.
- Salt ahead of time. Salting the chicken and leaving it uncovered in the fridge for a few hours helps draw out surface moisture.
- Keep the skin out of the juices. Place thighs on top of the vegetables or in open spaces so the skin isn’t sitting in liquid.
- Use high heat. A hot oven renders the fat under the skin, which is what makes it crackle.
- Finish under the broiler. If the skin still looks pale when the meat is done, broil for one to three minutes, watching closely so it doesn’t burn.
One Pan Dinner Ideas to Change Up the Flavors
Once you know the basic method, these one pan dinner ideas show how easily sheet pan chicken thighs can shift in style. For a Mediterranean version, use oregano and lemon, then add cherry tomatoes, olives, and red onion, finishing with crumbled feta. For something warmer and cozier, pair rosemary and thyme with butternut squash, carrots, and a drizzle of honey near the end. If you want a smoky twist, stir smoked paprika and cumin into the oil and roast the chicken with bell peppers and chickpeas. You can also swap the lemon for orange or add Dijon mustard to the marinade. The structure stays the same, while the personality of the meal changes completely.
Storing Roasted Chicken Leftovers Safely
Storing roasted chicken leftovers correctly keeps them tasty and safe. Let the food cool briefly, then refrigerate it within two hours of cooking in shallow, airtight containers. According to the cold food storage charts on FoodSafety.gov, cooked poultry keeps in the refrigerator for about three to four days. For longer storage, freeze it. To reheat, skip the microwave if you care about texture. A hot oven or an air fryer brings back some of the crispness in the skin and vegetables. Leftover chicken also makes great next-day meals: shred it into wraps, toss it into grain bowls, or chop it over a green salad. For a related walkthrough, check out One-Pot Pasta: 5 Recipes With Almost No Cleanup.
Why This Is the Easy Weeknight Dinner Worth Repeating
An easy weeknight dinner should be simple to shop for, quick to prepare, and satisfying enough that nobody misses takeout. This recipe checks every box. Active prep takes about 15 minutes, and the oven handles the rest while you help with homework, answer emails, or simply sit down. The ingredients are affordable and flexible, and the cleanup is limited to one tray and a bowl. Best of all, sheet pan chicken thighs reward you more each time you make them, because you’ll start to learn your oven, your favorite herb blends, and the vegetables your family loves most. That kind of confidence is what turns a recipe into a habit.
Frequently Asked Questions
How long do sheet pan chicken thighs take to cook?
At about 425°F (220°C), skin-on thighs with the bone usually take around 35 to 45 minutes, while boneless thighs often finish in about 20 to 25 minutes. Always confirm doneness with a thermometer rather than relying on time alone.
Can I use dried herbs instead of fresh?
Yes. Use roughly one-third the amount of dried herbs compared to fresh, since dried herbs are more concentrated. You can also scatter fresh parsley over the finished dish for a bright finish.
Do I need to marinate the chicken in advance?
It isn’t required, but it helps. Even 30 minutes adds flavor, and a few hours in the fridge gives deeper seasoning. If you’re short on time, season and roast right away.
Why are my vegetables soggy instead of crispy?
The pan is probably too crowded, or the oven wasn’t fully preheated. Spread the vegetables in a single layer, use two trays if needed, and roast at high heat.
Can I make sheet pan chicken thighs ahead for meal prep?
Absolutely. Roast a full tray, cool it quickly, and divide it into airtight containers. Reheat portions in the oven or an air fryer for the best texture throughout the week.

Ghani Mejber — Founder & Lead Editor
Ghani Mejber is a home cook and the creator of The Quick Pantry. He specializes in simple, budget-friendly weeknight meals, one-pot dinners, and reliable meal-prep strategies designed for busy people who want delicious, comforting food without spending hours in the kitchen.